Building a Multi-Room Digital Music System
Author Note: This was originally published by Linux Journal in 2007. I am replicating it here for posterity.
Like many media buffs these days, I have a media center computer in my house. It is a small VIA M10000 Mini-ITX system in a Casetronic C137 case running Freevo on top of Gentoo Linux. It sits inside of my media cabinet and serves music, video, photos and various other bits of information to my TV. The small media center gets all of it’s content from a much larger AMD64 Gentoo Linux server that resides in a closet near the back of the house. The two machines talk to each other over a wired network using NFS (Network File System). I will be the first to tell you that it is great to have all of my music, videos and photos in a digital format and easily accessible.
In the same spirit of my media center computer I wanted to have a few small systems that could sit on a shelf or in a drawer that would serve music to different parts of the house. There are many products on the market that will broadcast audio from a computer and others that will play the resulting stream. The problem with most of these, to me, is that there is only one stream available. I wanted the ability to play different music in each room at the same time and control it with one device. There are a few newcomers to the market that do exactly what I wanted, namely the Sonos Digital Music System. Which was reviewed in the March 2006 edition of Linux Journal. However, I wanted to tackle this one myself.
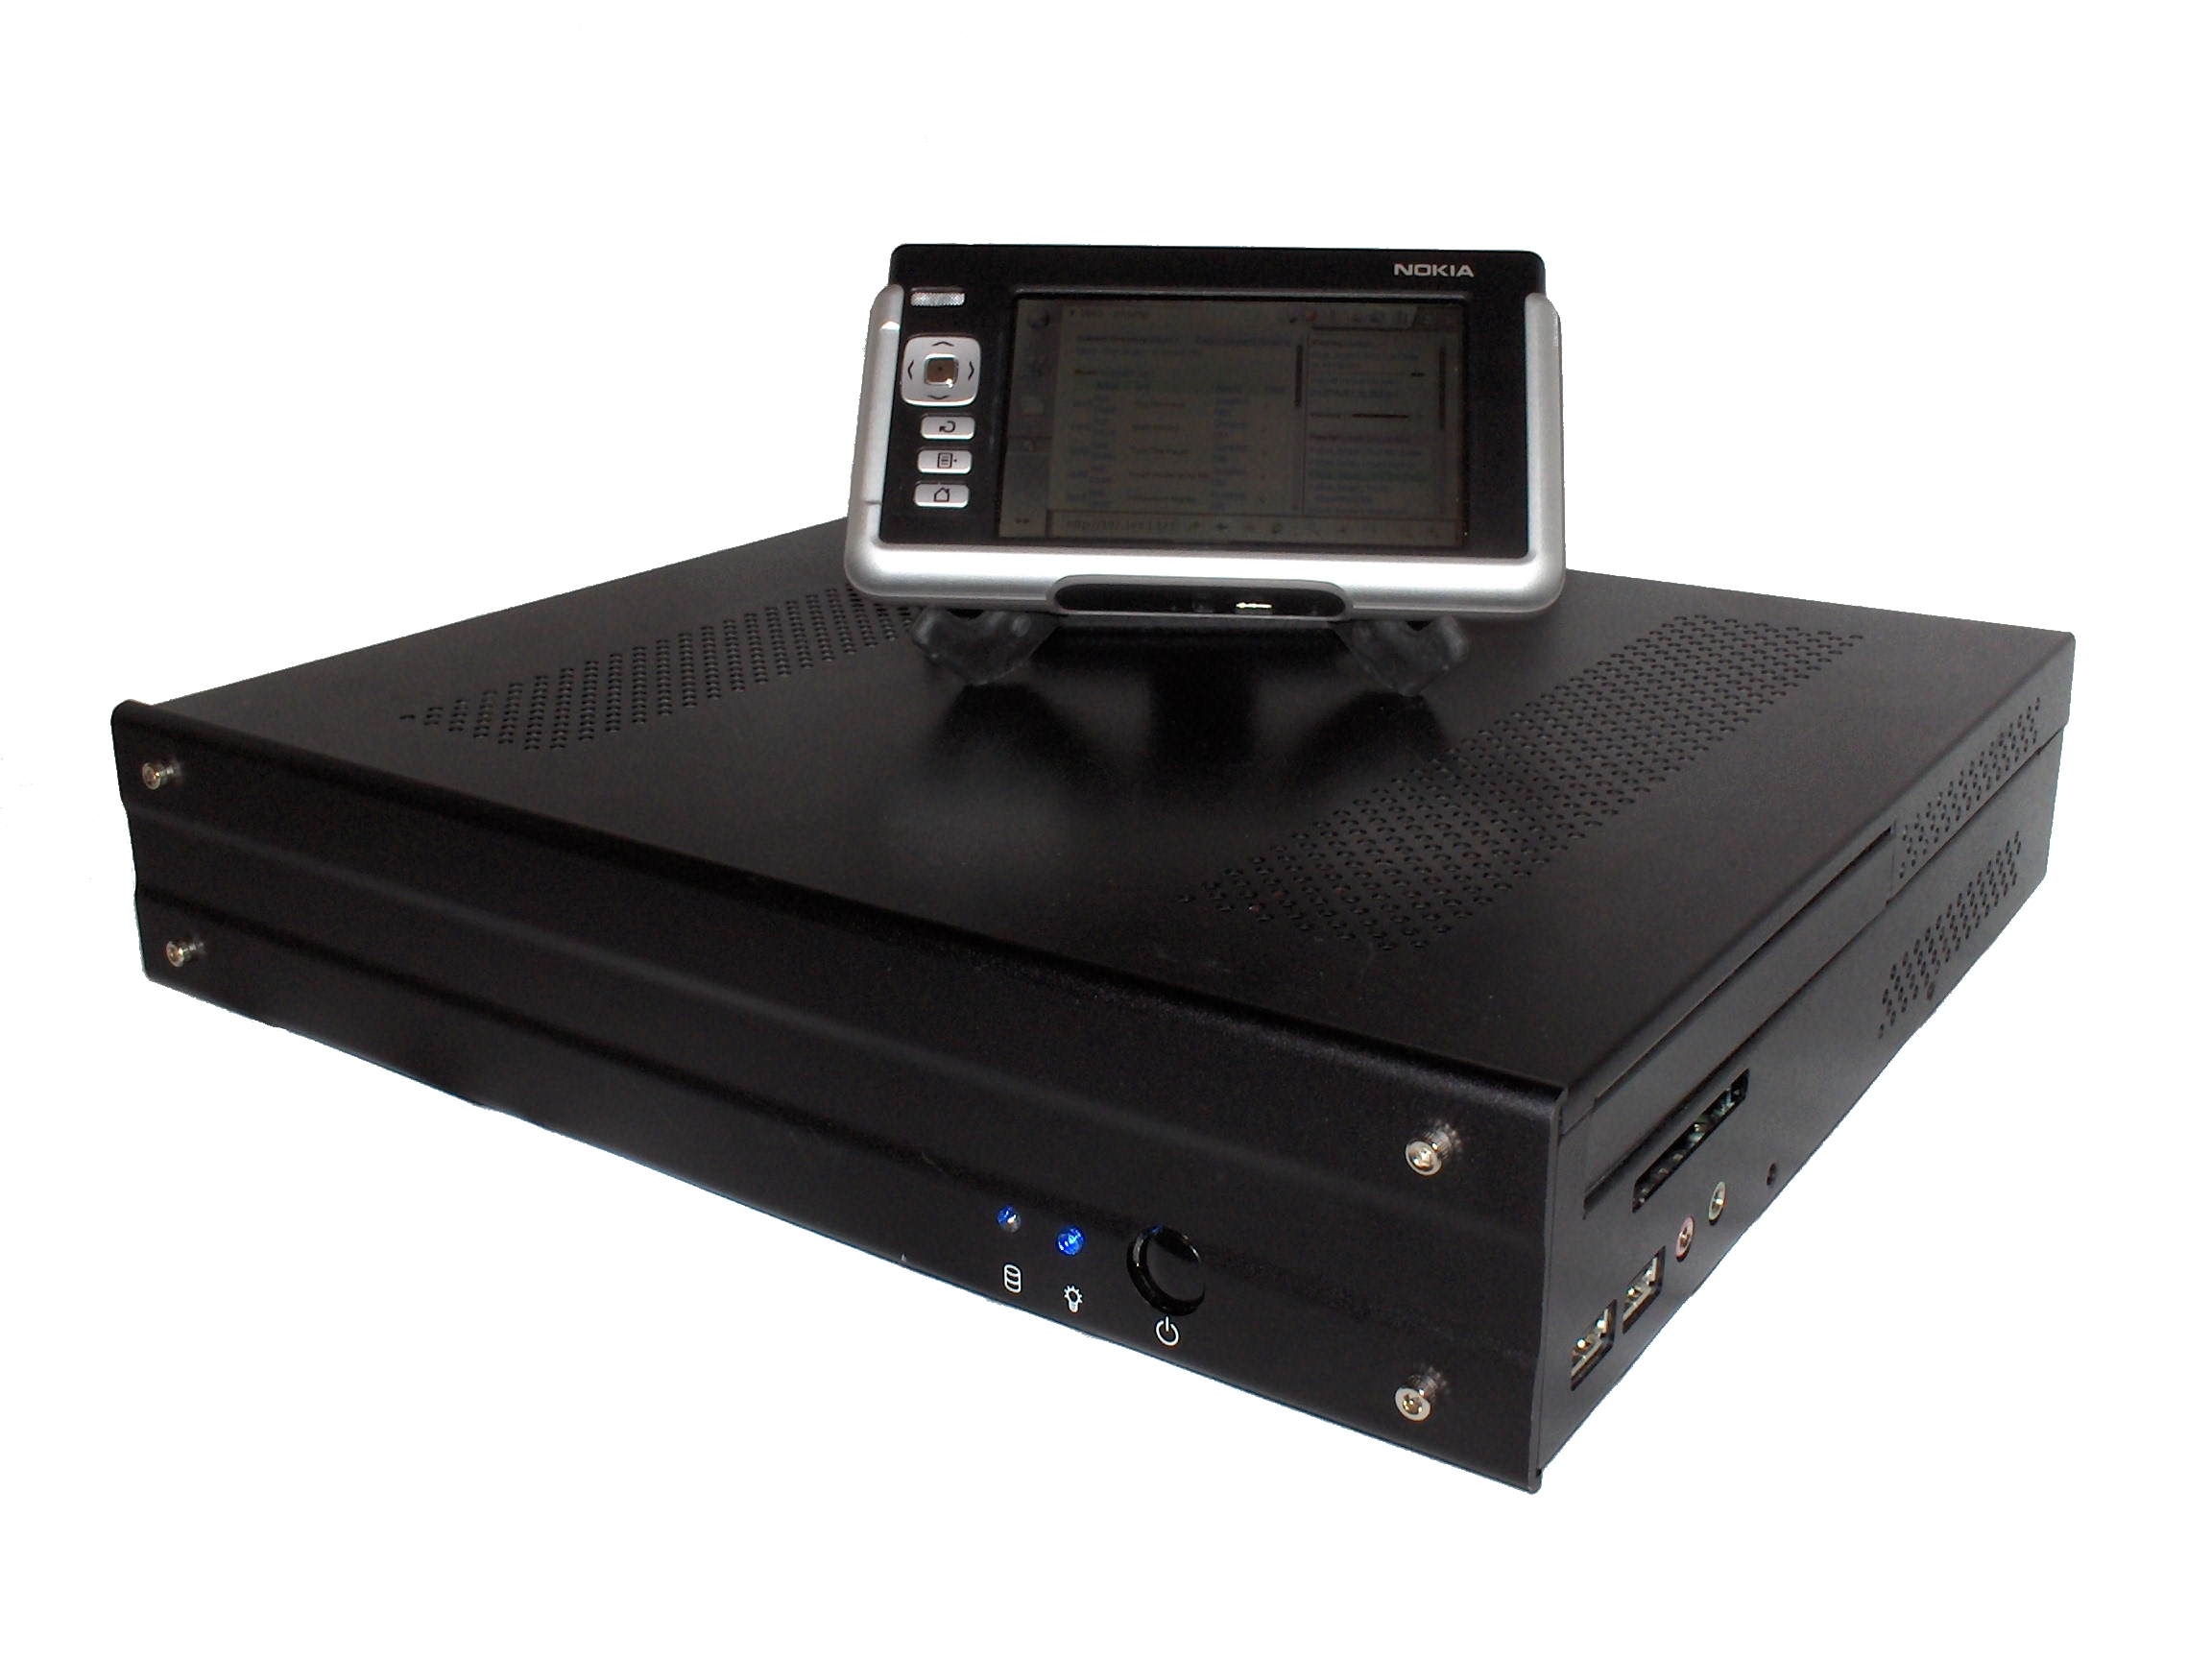
My idea was to build a fan-less Mini-ITX appliance that would grab content from my file server and play it using MPD (Music Player Daemon). To control the appliance I would use lightTPD (a PHP enabled web server) and phpMp (a PHP application that controls MPD), running on the appliance. This gives any computer on the network with a web browser the power to control the appliance. My controller of choice is a Nokia 770. Using Opera, that comes installed when purchased, I can point the browser to each of the appliances and control them over my wireless network.
Hardware for the Application
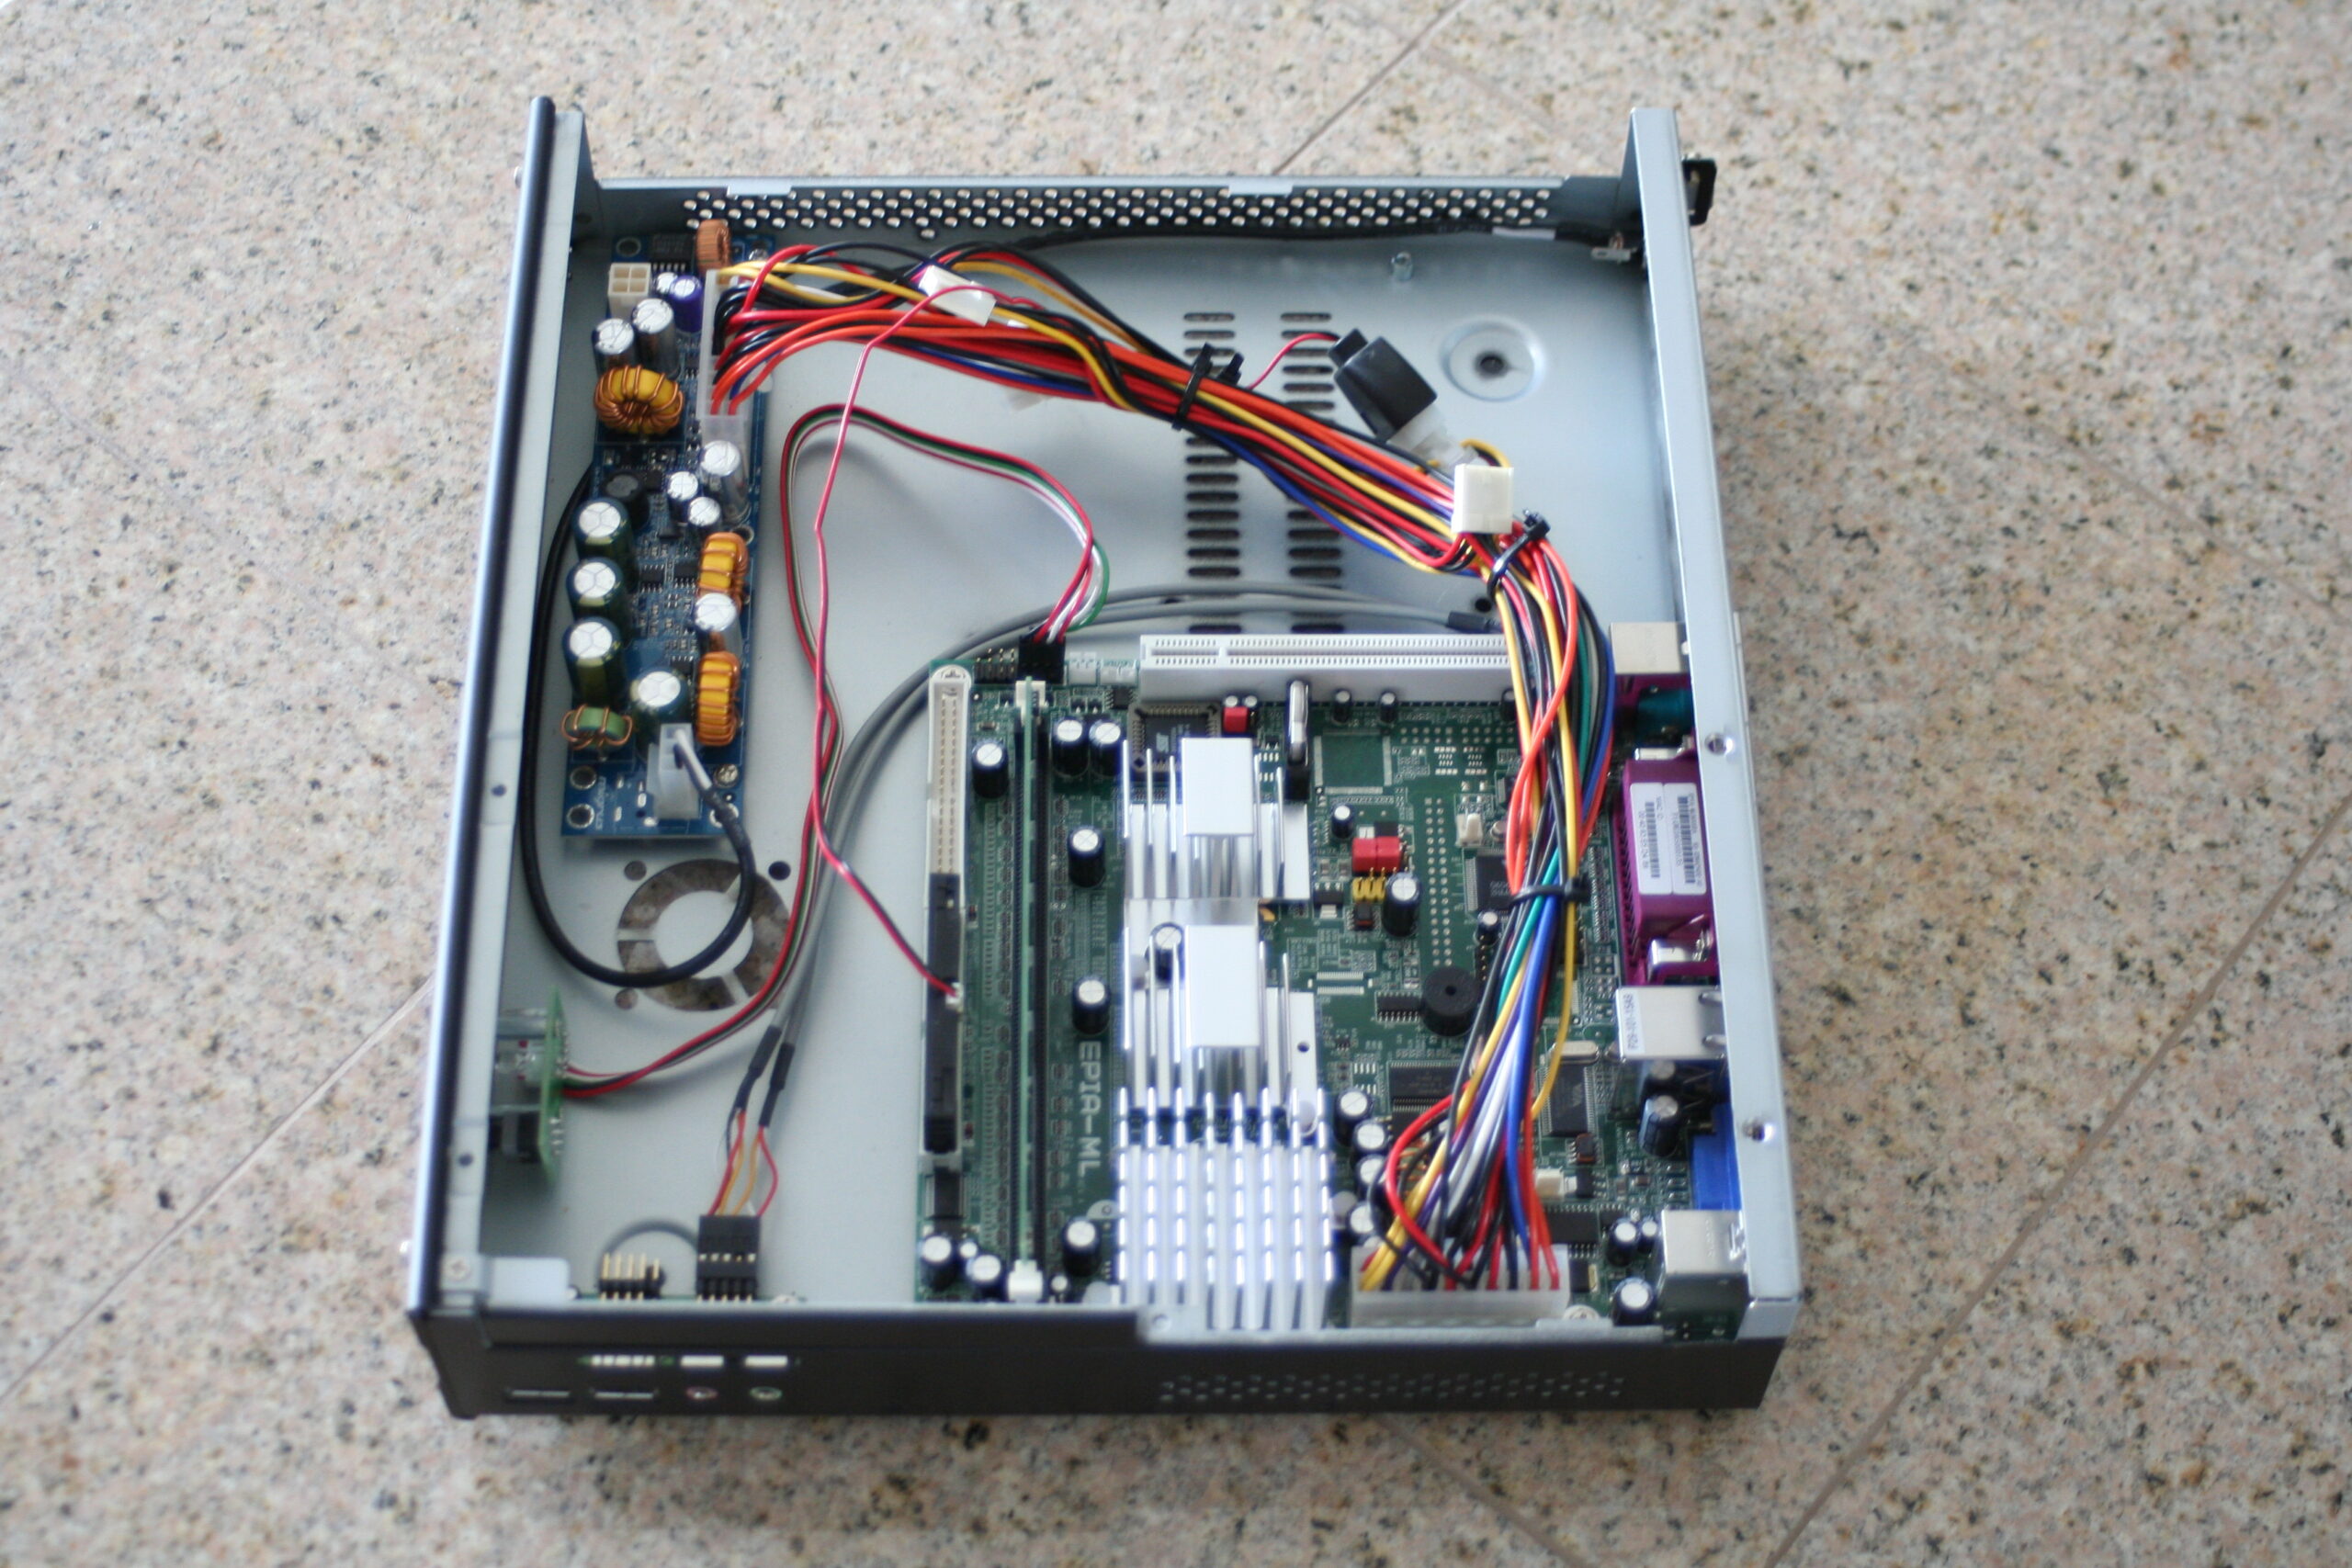
For the appliance, I chose to start with a VIA ML6000EA Mini-ITX motherboard. This board has many features that make it perfect for this type of appliance. The main one is the VIA 600 MHz Eden fan-less processor. This tiny processor is more than enough to push the applications and it makes absolutely no noise. Other nice features include 6 channel onboard audio, onboard LAN, support for 1 GB of memory and a PCI slot.
Because I wanted the appliance to be silent, I decided to forgo a standard hard drive. Instead, I opted for a 256 MB Flash Drive that plugs directly into a 40 pin IDE slot. The flash drive also draws it’s power from a standard 4-pin molex. I also added 256 MB of DDR 400 memory to finish out the internals.
To give the appliance a sleek look, I went with a Casetronic C158 case. This case has a smooth front which makes it look more like an appliance. Even though the case has room for a slim ROM drive I did not put one in because MPD does not have support for playing audio from a CD. The case also has audio jacks on the front right side that provide easy access for enjoying music with headphones. Another nice feature on this case is the optional CompactFlash card reader that can be mounted from the inside and accessed right below the CD ROM tray.
Embedded Linux
Since I chose to use a flash based hard drive, I needed to make sure that my Linux installation was small, less than 250 MB, and did not write to the disk. Flash based drives and disks only have a certain number of write cycles that can be preformed on them before they give out. My particular drive, made by IEI Global Sourcing, supports over one million cycles. Even with support for this many cycles, the drive would stop working in a fairly short amount of time due to disk writes, especially if there is a swap partition on the disk. With all of this factored in I decided an embedded Linux system was the best fit.
Embedded Linux systems can be created in a variety of ways. I chose to go with embedded Gentoo (see resources). Since my development machine, a Dell 600m laptop, already runs Gentoo I would not need to create a custom build chain. I could just get a snapshot from the Gentoo website and use my laptop as a host to build the embedded system.
Before I attempted to build the system I took a long look at Building Embedded Linux Systems by Karim Yaghmour (see resources). This book provides a very detailed view of the exact ingredients that make up a functional Linux operating system. And as the title states shows the reader how to build embedded Linux systems. I also followed the instructions written by Heath Holcomb on how to construct an embedded Gentoo system (see resources). Heath’s instructions describe all of the steps that are needed to get an embedded Gentoo system built and operational. Without these resources this entire project would not have been possible. I would highly suggest that you take a look at them if you are considering doing anything with embedded Linux.
It should also be noted that if you want to build an appliance like this but would rather use a hard drive, and save yourself some time, you can use almost any Linux distribution. Most of them come with all of the software for this project already in their package systems.
Building the embedded Gentoo system was not too difficult. If you have ever installed Gentoo before making the leap into the embedded realm is not very hard. There are several things did make my build interesting though.
I followed Heath’s instructions to the letter and when I was finished I had a working embedded Gentoo system. After testing it and making sure it all worked I went on to install the rest of the software that I needed (MPD, lightTPD, phpMp). This proved to be a bit problematic. Portage (Gentoo’s package system) wanted to install several software packages that I did not want or need. So I started over from scratch and carefully installed only the dependencies for the software that I needed. Then, I installed my three pieces of software with a “nodeps” flag to insure that I did not get the unwanted software.
During the build process, I tested the system several times. I wanted to make sure that with each step I was making progress and not breaking something that had worked previously. To test the system I used a USB media reader to copy the embedded Gentoo system off of my laptop to a CompactFlash card. I then plugged the CompactFlash card into a card reader plugged directly into my appliance computer. This allowed me to test the appliance and emulate how it would work once everything was working.
Networking Setup
As I mentioned earlier, all of my media is on a file server. Having my media stored this way allows me to have any number of computers on my network access the files like they were stored locally. In order to share the files, I setup NFS on the server. Using NFS I can allow IP addresses or sets of IP addresses to connect to specific directories on the server, and have specific security rules.
For the appliance computer I setup two shares. The primary share is where all of the audio content is stored. This share is read only, I did not want anything mounting this directory to be able to modify it. The second share is a writable share where all of the MPD meta data is stored (more on this later in the article). Both shares are setup with IP restriction only. I decided against using user authentication for reasons of simplicity.
To complete the network setup on the server I made sure NFS started on boot. Then I added the mount lines to a start up script on the appliance.
The Music Player Daemon
At the core of this appliance is MPD. MPD can play almost any audio format; mp3, ogg, aac (without DRM), flac, etc. For my setup I enabled ogg, mp3 and aac, seeing as how all of my music files are one of these formats. MPD will also play audio streams. This gave my appliance the ability to play all of my faviorite Internet radio stations. Configuring MPD is actually fairly easy. There are only a handful of settings that need to be changed for MPD to function correctly.
The two most obvious settings that need to be changed are “music_directory” and “playlist_directory”. I pointed the music directory setting to the first NFS mount (the one with all of the audio files). The play list directory setting was pointed to a “playlist” directory on the second NFS mount. By pointing the play list setting to a common directory all of the appliances on the network can share play lists.
The next setting that I modified was “db_file”. This setting points to a file where MDP stores all of the metadata about the audio files that are on the system. I pointed this setting to a file called “mpd.db” on the writable NFS share. Just like the play list setting, this will allow all of the appliances to share a common database of audio information. This will also allow any appliance to update the MPD database.
The final setting that I modified was “state_file”. The state_file setting points to a file that holds the information about what state MPD was in when it stopped. Again this points to a file on the writable NFS mount. However, the state file is unique for each appliance. When I turn an appliance back on I want it’s state not the state of another appliance.
Controlling the Appliance
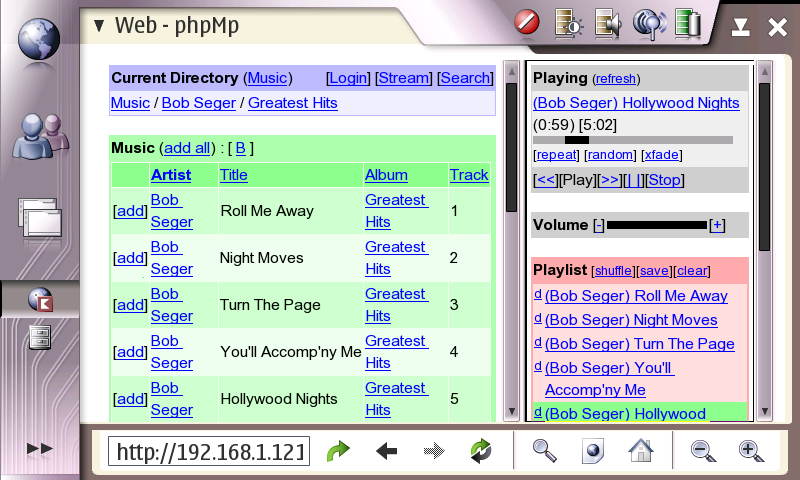
Since the appliance does not have a screen I needed a way to control the audio playback. Fortunately the same folks that developed MPD also developed phpMp. phpMp is a small and simple web application designed to control an instance of MPD using the socket extension in PHP. In order to get phpMp running I had to install a web server. Since I was using an embedded platform I had to be conscious of application size. I also wanted something that was very easy to configure and did not take up too many resources. All of this considered I decided to use lightTPD. lightTPD is a small, fast, full featured web server that can run PHP scripts.
Out of the box lightTPD and phpMp needed very little configuration, which is a great feature. Of course since the appliance is headless I had to make sure lightTPD started automatically during the boot process.
Problems and Challenges
All things considered, I had very few problems getting everything working. The few issues that I did have dealt with the OS being embedded. Fortunately they were easily remedied.
The first issue was application logging. MPD, lightTPD and the OS itself are configured by default to log everything to files. With my hard drive mounted as read only this caused a few issues. To solve the problem I added a line in the fstab to mount the /tmp directory as a tmpfs. Then I redirected all logging to the /tmp directory. Doing this allowed all of the applications to log information and still have a read only file system.
The next issue I had dealt with the ALSA (Advanced Linux Sound Architecture) device files. Most Linux systems nowadays use UDEV to dynamically create device files on boot. Among the device files created by UDEV are the sound card device files that ALSA uses. Since my system did not have UDEV these files were never created. To solve the issue I manually created the device files that I needed and made them part of my embedded distribution.
The last challenge dealt with turning the appliance off. Since there is not a console or an interface to tell the system to shutdown you have to use the power button on the appliance. This lead me to building ACPI (Advanced Configuration and Power Interface) support into the embedded system. With ACPI I configured the system to shutdown when the power button is pressed. Since the operating system is so small and has so few process running shutdown only takes a split second. Eventually, I would like to add support for shutdown to the phpMp interface, but for now the power button works just fine.
Enhancements and Improvements
Through the course of building this I thought of several things that I would like to do to enhance the appliance. I would like to add a LCD to the front of the case that would show me the artist, album and name of the current track. LCDproc has support for MPD and LCD4linux is adding support so installing an LCD should be trivial. I would also like to build a small amplifier that could fit into the case so that I would not have to use powered speakers. My ideas were not relegated to the appliance alone, I thought of several enhancements that I would like to see to the Nokia 770 and MPD.
The Nokia 770 is the perfect interface for this appliance. As it’s user base grows so do the features and the amount of applications it can run. Developers across the world are porting more and more applications to it every day. In the future, I would like to see gmpc (Gnome Music Player Client) be ported. gmpc is GTK+ application that connects to and controls MPD. If gmpc were to be ported to the Nokia 770, lightTPD and phpMp would no longer be needed to control the appliance. The 770 could control it natively.
There are several enhancements that I would like to see added to MPD that would make this appliance even better. The first one is a cover art plugin. Adding support for this has been discussed among the MPD developers but it has not been added to date. Another nice addition would be a tag editor that allows the user to update the meta information stored in an audio file.
Conclusion
he Mini-ITX line of motherboards, coupled with Linux, provide a solid foundation for building all kinds of appliances just like the one described in this article. It took me just short of a month to build and test the appliance. It was also fairly cheap for something so small. All of the hardware for the appliance cost about $320 USD.