End-to-end Video Podcast Production on Linux
Author Note: This was originally posted on linux.com in 2008. I am replicating it here for posterity.
Producing a video podcast entirely on Linux is not only possible but fairly easy to do. This article outlines the steps of how to make a video podcast entirely on Linux.
The process of creating a podcast is basically divided into three steps:
- Filming – This step just involves you, an idea, and a camera.
- Editing/Video Production – Production is the longest part of the process; it involves taking all of the raw footage and making it look good for the viewers. This article explains how to use Kino to capture and edit the source video. Then use FFMpeg to render the final video.
- Publishing – To create a proper podcast you have to have an RSS feed complete with enclosure tags; fortunately there are several open source tools that will do this for you.
The primary focus of this article is to look at items 2 and 3, sorry the creative part is up to you.
Capturing Video
The first step to editing the video is to get it off of your camcorder. This process can change depending on the make and model of your camcorder. All of my equipment uses MiniDV to store media and firewire (IEEE-1394) as a delivery medium. Most consumer camcorders made in the last decade support firewire capture.
By default most Linux distributions do not allow users to access firewire devices. It is possible to add all of the permissions that will allow normal users to access firewire devices; however, it is much easier to just launch kino as the root user to do the video capture.
Once kino has launched click the Capture tab in the right hand menu to enter capture mode, provide a file name, and press the capture button. If all goes well Kino should start capturing video from your camcorder; if you have trouble check out the Kino Capturing DV video tutorial created by Dan Dennedy, Kino’s lead developer.
After the capture completes it is a good idea to exit Kino and restart it as a normal user. Before relaunching Kino change the permissions of all of the files and directories created during the capture process to a normal user account.
Basic Editing
There are hundreds of things you can do when editing video and they are all really up to you. However, there are a few tasks that are almost always necessary.
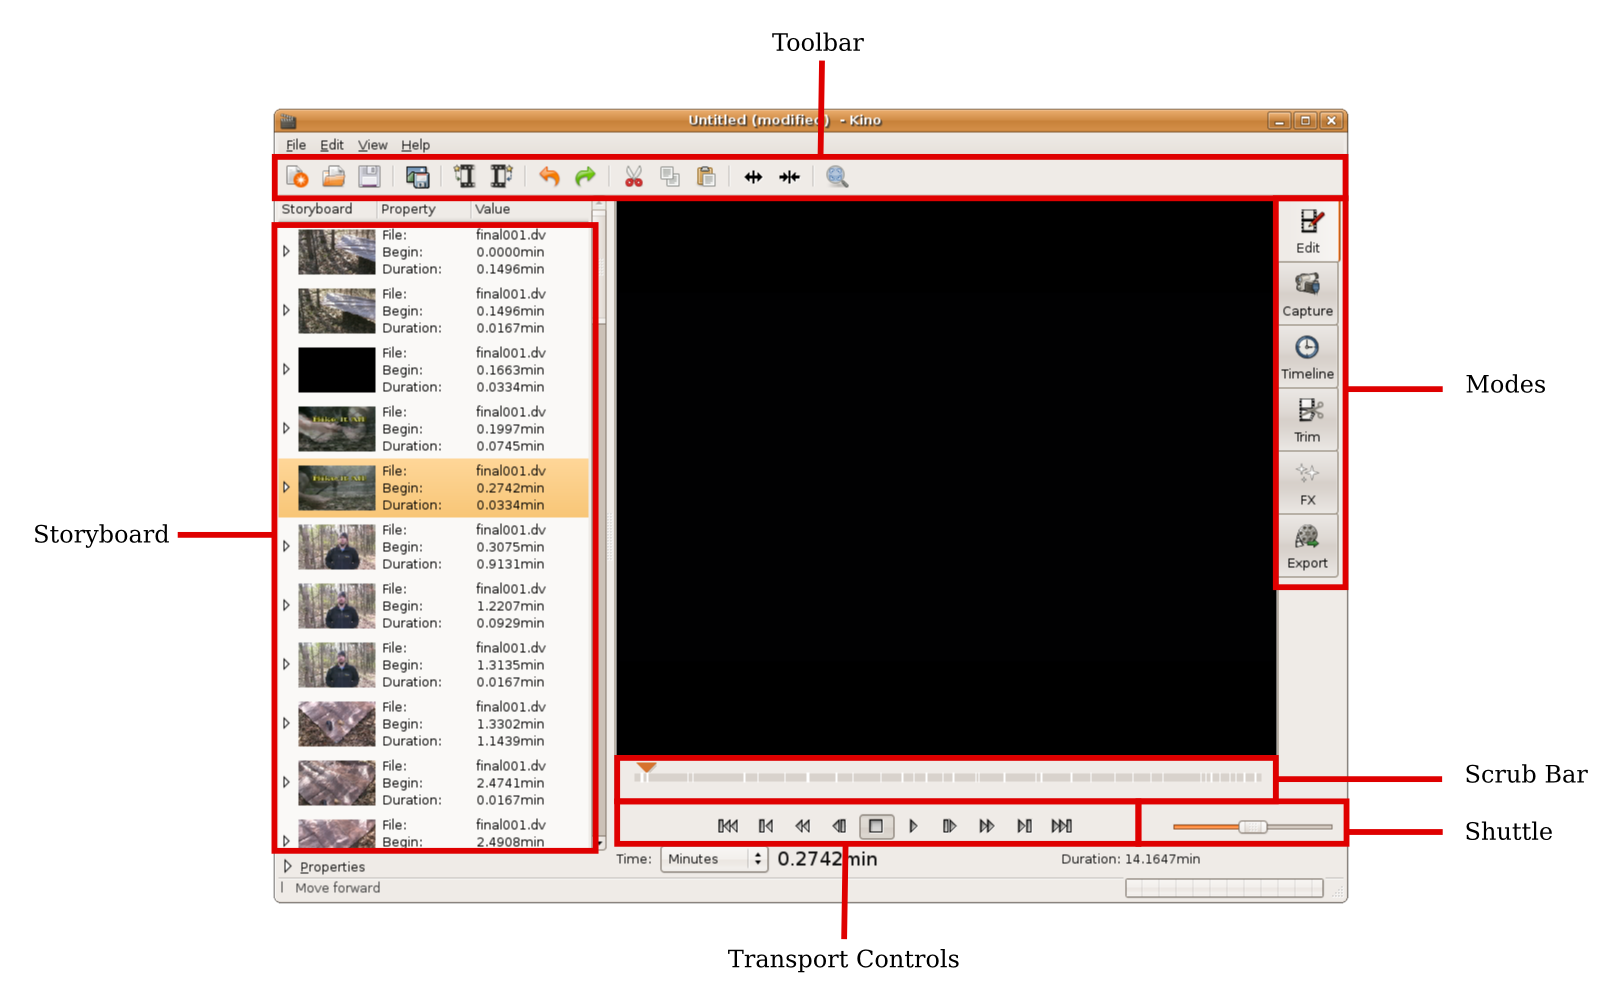
- Cutting and Trimming – This is the process of taking out unneeded or unwanted pieces of footage. Trimming is accomplished by first selecting a block of video from the Storyboard. Then clicking the Trim tab in the tools menu to enter trim mode. And finally, moving the start and end points to desired location and clicking the Apply button.
To cut a segment out of the storyboard you have to be in Edit or Trim mode. Once you are in a proper mode, select the desired clip and click the Cut icon (scissors) in the toolbar. The same thing can be accomplished by using the keyboard combination ofCtrl+Xor clickingEdit > Cutfrom the main menu.
If you need to trim and/or cut out multiple portions of a single video segment it is best to divide the segment first. This can be accomplished by placing the playback arrow, in the Scrub Bar, at the desired location and clicking the split icon in the toolbar. - Rearranging – Oftentimes footage is shot out of order and needs to be moved around during production. To move a clip click on it in the Storyboard and drag it to its new location.
- Transitions – Transitions are among the simplest effects to add; they also give the final video a polished look. The most common transition is a dissolve; this takes frames from the end of one segment and blends them with the beginning of the next segment.
Kino has to be in FX mode to add effects to the video. Once in FX mode select the segment where the dissolve needs begin. Then check the box next to Limit to in the Overwrite tab; make sure Closing is select from the menu next to the checkbox. By default Kino will set the time to the last second of the segment; for most applications this will work fine. Next, make sure No Change is selected in the Audio Filter tab and Cross Fade is selected in the Audio Transition tab; doing this will blend the audio from the two segments. In the Video Filter tab ensure that No Change is selected and in the Video Transition tab select Dissolve. At this point you can preview the transition by clicking the Play button in the Transport Control bar. Clicking the Render button next to the Scrub bar will render the effect and add it to the Storyboard.
There are several transition effects in Kino and they all have customization settings. Play with them and see what works best for your video. If you do not like the results Kino allows you to undo them and start over.
Advanced Editing
Adding Info Bars
Info bars are the little graphics that appear on the bottom of the screen giving the user more information in the form of text. The first step to adding a info bar is selecting where in the video to add it. If you want to add an info bar in the middle of a segment it is easier to split the segment twice — once where it starts and again where it ends. When the segments are ready, get into FX mode and select the segment that needs the info bar. Make sure the Audio Filter, Audio Transition, and Video Transition tabs have No Change selected; then go to the Video Filter tab.
Generally info bars have some sort of background to make the text stand out. The easiest way to add a background is to do it when you add the text. Another way is to superimpose an image onto the video then add the text — a two step process. Superimposing will allow you to use a graphic such as a logo or a background that has a gradient.
Before superimposing an image you have to make it; there are several tools to do this — Inkscape and the Gimp to name a few. It is best to use the dimensions of the final video when creating the image. On the FX tab in Kino select Superimpose from the Video Filter tab. Use the Browse button next to the Image field to find your image. Now, preview the changes by pressing the Play button. If you want to change the position or add an animation effect make the appropriate changes to the settings on the Video Filter tab. Repeat the preview process until you like the result then render. If you added animation make sure to remember the settings, you will more than likely want to do the same effect with the text.
The first step to adding text to the segment is selecting Titler on the Video Filter tab. This tab allows you to change the font, position the text, add a background, animate the text and of course type the text to be displayed. If you superimposed the background image use the positioning tools to make sure the text lines up correctly. If you did not use a background image you can use the Pad settings to add a background. This tab also gives you a real-time preview of the changes in the preview window as you type.
Dubbing Audio
When filming there are often parts of the footage that for one reason or another need narration. Adding narration is a two step process; first you have to record the audio then you have to overlay the sound on the video. Audacity is arguably the best open source tool for doing voice recording. Simply open Audacity and record whatever it is you want to say then export the audio. In the past I have had difficulty using WAV files in Kino so I typically export audio in high quality OGG.
To add audio in Kino you have to be in FX mode. Once there, select the segment that needs narration; make sure the Audio Transition, Video Filter, and Video Transition tabs are set to No Change. Next set the Audio Filter tab to Dub and fill in the Audio File box. Again, Kino allows you to preview the changes by pressing the Play button. You can also mix the narration with the existing audio in the video by selecting Mix instead of Dub.
Adding Credits
Credits are one of the easier effects to add. In FX Mode, click the Create tab and change the Frames setting to an appropriate length; 25 frames is about 1 second. Then select Titler from the Video Filter tab, make sure the rest of the tabs are set to No Change. Now type all of your credits into the text box on the Video Filter tab. For a simple scrolling effect change the Initial Position setting to Center/Bottom Off and the Final Position setting to Center/Top Off; this will make the text scroll from the bottom of the screen to the top of the screen. Of course you can adjust these settings to your liking and even add audio if you want.
Rendering the Final Video
Get into Export mode once all of the video is edited and ready to be encoded. There are several tabs in this mode; for podcasting, DV File and Other are the important ones. On the Other tab there are several ready made export scripts that work well in most cases. If your source video is in widescreen (16:9 aspect ratio), like mine, these may not work with some video hosting sites. The reason why is because Kino exports everything in NTSC or PAL dimensions. In most cases when a video site converts the video for display on the web they use the physical dimensions, not the actual dimensions and the final video looks stretched.
To combat this issue I suggest creating a custom script for encoding your final video. Before doing that it is best to export the edited video into new raw DV files. Do this by selecting the DV File tab, selecting a file name, select Raw DV from the File Type options, and click the Export button. This will take a few minutes to several hours depending on the length of your video. Once the DV export has finished it is time to render the final version.
Before rendering the final video you have to make a decision about what audio and video codecs to use. This of course all depends on your target audience. From my experience the most universally accepted combination is H.264 video and AAC audio. These codecs play well on all of the major operating systems and have fairly good compression. Of course you can publish multiple feeds with different codec and size options. However, if you are looking for a one-size-fits-all solution I would suggest H.264/AAC in a MP4 container.
FFMpeg does a good job of producing quality video in several formats. It also accepts DV file information as a stream which makes it ideal for accepting raw video exported from Kino
cat dv-file.dv | ffmpeg -f dv -i pipe: -acodec aac -vcodec h264 -s 640x360 -aspect 16:9 video.mp4The line above echos all of the DV files and pipes the content to FFMpeg. If Kino split your export into multiple files be sure to use wildcards to get all of the files. The FFMpeg settings are as follows.
-f dvTells FFMpeg that the input format is raw DV.-i pipe: Lets FFMpeg know the input is coming from a pipe. This can be changed to any file that FFMpeg can decode.- –
acodecIs the audio codec, AAC in this case. - –
vcodeIs the video code, H.264 in this case. -sSpecifies the target size. Giving FFMpeg a size lets you specify the exact size of the output. In this case it shrinks the video to 640 pixels wide and 360 tall, preserving an aspect ration of 16:9.-aspectTells FFMpeg the aspect ratio to use when encoding. This is 16:9 for widescreen and 4:3 for full screen.- The last parameter is the name of the output file. The extension is important because it specifies what container to use. For more information about video containers take a look at the Container Format article on Wikipedia.
Running this command will encoded video and get it ready to hit the Internet. Most of the video hosting sites out there will create a Flash version of the video for you, if you choose to use one. However, if you wish to do it yourself FFMpeg will take care of it nicely.
ffmpeg -i video.mp4 -acodec mp3 -ab 64k -ar 44100 -f flv -b 650k video.flvThis command is very similar to the one used above. The only exceptions deal with the quality by changing the default bit rates. For more information about all of the FFMpeg options refer to the FFMpeg documentation.
If you want to host your own Flash videos there are several open source Flash video players available: FlowPlayer, FLV Player, OS FLV.
Making the Podcast RSS Feed
The final step to making a podcast is creating an RSS podcast feed. The only difference between a normal RSS feed and a podcast RSS feed are enclosure tags. These special little tags tell podcatchers to download the files listed in the feed.
There are several ways to create these RSS Feeds, many of the free video hosting sites will do it for you. However, if you want more control consider using one of the following tools.
- WordPress – The popular blogging software will automatically add enclosure tags to any media file that is linked to in a post. This automatic feature turns any WordPress RSS feed into a podcast feed.
- Drupal – The Drupal framework has several modules that will allow you to create a podcast RSS feed. The Video module works well for video podcast applications; however, it can be a bit difficult to wrangle at first.
- Movable Type – The newly re-open sourced Movable Type will also allow you to publish media in a RSS feed, after doing a little bit of work. There is a good article about how to add enclosures to Movable Type RSS feeds if you want to go that route.
As with anything for the masses there are hoops to jump through. In the podcasting world it is iTunes, currently the most used podcatcher. iTunes likes feeds to have special metadata to help it display content. There are several ways to do this with the tools mentioned above but there is no silver bullet. In my opinion, the easiest way to do it currently is to just use Feedburner. Feedburner will inject all of the information that iTunes wants directly into your feed.
Resources
There are several free resources for podcasters on the Internet that should be mentioned.
- Blip.tv will host all of your content for free with very few restrictions. They even create Flash versions of the source video automatically.
- OurMedia is a place where content producers can upload all of their content for free. They also have a community of artists that are willing to share their content for use in podcasts.
- Magnatune has podcast friendly music that can be used to create podcasts.
There are other companies out there that will host video for free and have podcast friendly content. These are just a few of the more flexible and popular.
Conclusion
I hope this article has shown you that you do not need big budget software and equipment to create a video podcast; Linux will more than get the job done. All of the procedures here work on a Dell 600m laptop running Ubuntu Linux (7.10).